Bright-Field Light Microscope and Microscopic Measurement of Organisms SAFETY and CONSIDERATIONS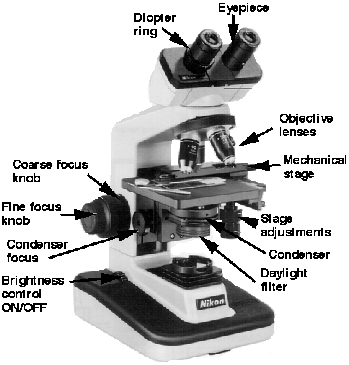 Slides and coverslips are glass. Be careful with them. Do not cut yourself when using them. The coverslips are very thin and easily broken. Dispose of any broken glass in the appropriately labeled container. If your micro scope has an automatic stop, do not use it as the stage micrometer is too thick to allow it to function properly. It may result in a shattered or broken slide or lens |
Medical Application
In the clinical laboratory, natural cell size, arrangement andmotility are important characteristics in the identification of
a bacterial pathogen
Materials per Studentcompound microscope
lens paper and lens cleaner
immersion oil
prepared stained slides of several types of bacteria
(rods, cocci, spirilla), fungi, algae, and protozoa
glass slides
coverslips
dropper with bulb
newspaper or cut-out letter e’s
tweezers
ocular micrometer
stage micrometerLearning ObjectivesEach student should be able to
1. Identify all the parts of a compound microscope
2. Know how to correctly use the microscope—
especially the oil immersion lens
3. Learn how to make and examine a wet-mount
preparation
4. Understand how microorganisms can be measured
under the light microscope
5. Calibrate an ocular micrometer
6. Perform some measurements on different
microorganisms
Why Are Prepared Slides
Used in This Exercise?Because this is a microbiology course and most of the microorganisms studied are bacteria, this is an excellent placeto introduce the student to the three basic bacterial shapes:
cocci, rods, and spirilla. By gaining expertise in using the
bright-field light microscope, the student should be able to
observe these three bacterial shapes by the end of the lab
period. In addition, the student will gain an appreciation for
the small size and arrangement of procaryotic cell structure.
One major objective of this exercise is for the student
to understand how microorganisms can be measured under
the light microscope and to actually perform some measurements on different microorganisms. By making measurements on prepared slides of various bacteria, fungi,
algae, and protozoa, the student will gain an appreciation
for the size of different microorganisms discussed throughout both the lecture and laboratory portions of this course
Principles
The bright-field light microscope is an instrumentthat magnifies images using two lens systems. Initial
magnification occurs in the objective lens. Most microscopes have at least three objective lenses on a rotating base, and each lens may be rotated into alignment with the eyepiece or ocular lens in which the
final magnification occurs. The objective lenses are
identified as the low-power, high-dry, and oil immersion objectives. Each objective is also designated by
other terms. These terms give either the linear magnification or the focal length. The latter is about equal
to or greater than the working distance between the
specimen when in focus and the tip of the objective
lens. For example, the low-power objective is also
called the 10×, or 16 millimeter (mm), objective; the
high-dry is called the 40×, or 4 mm, objective; and
the oil immersion is called the 90×, 100×, or 1.8 mm
objective. As the magnification increases, the size of
the lens at the tip of the objective becomes progressively smaller and admits less light. This is one of the
reasons that changes in position of the substage condenser and iris diaphragm are required when using
different objectives if the specimens viewed are to be
seen distinctly. The condenser focuses the light on a
small area above the stage, and the iris diaphragm controls the amount of light that enters the condenser.
Immersion lens
When the oil immersion lens is used, immersion oil
fills the space between the objective and the specimen.
Because immersion oil has the same refractive indexas glass, the loss of light is minimized (figure 1.1). Theeyepiece, or ocular, at the top of the tube magnifies
the image formed by the objective lens. As a result, the
total magnification seen by the observer is obtained by
multiplying the magnification of the objective lens by
the magnification of the ocular, or eyepiece. For example, when using the 10× ocular and the 43× objective,
total magnification is 10 × 43 = 430 times.
Procedure for Basic Microscopy:Proper Useof the Microscope
1. Always carry the microscope with two hands. Placeit on the desk with the open part away from you.
2. Clean all of the microscope’s lenses only with
lens paper and lens cleaner if necessary. Do not
use paper towels or Kimwipes; they can scratch
the lenses. Do not remove the oculars or any other
parts from the body of the microscope.
lens paper and lens cleaner if necessary. Do not
use paper towels or Kimwipes; they can scratch
the lenses. Do not remove the oculars or any other
parts from the body of the microscope.
3. Cut a lowercase e from a newspaper or other
printed page. Prepare a wet-mount as illustrated in
figure 1.2. Place the glass slide on the stage of the
microscope and secure it firmly using stage clips.
If your microscope has a mechanical stage device,
place the slide securely in it. Move the slide until
the letter e is over the opening in the stage.
4. With the low-power objective in position, lower
the tube until the tip of the objective is within
5 mm of the slide. Be sure that you lower the tube
the tube until the tip of the objective is within
5 mm of the slide. Be sure that you lower the tube
while looking at the microscope from the side.
5. Look into the microscope and slowly raise the
tube by turning the coarse adjustment knob
counterclockwise until the object comes into
view. Once the object is in view, use the fine
adjustment knob to focus the desired image.
tube by turning the coarse adjustment knob
counterclockwise until the object comes into
view. Once the object is in view, use the fine
adjustment knob to focus the desired image.
6. Open and close the diaphragm, and lower and raise
the condenser, noting what effect these actions
have on the appearance of the object being viewed.
Usually the microscope is used with the substage
condenser in its topmost position. The diaphragm
should be open and then closed down until just a
slight increase in contrast is observed (table 1.1).
the condenser, noting what effect these actions
have on the appearance of the object being viewed.
Usually the microscope is used with the substage
condenser in its topmost position. The diaphragm
should be open and then closed down until just a
slight increase in contrast is observed (table 1.1).
7. Use the oil immersion lens to examine the stained
bacteria that are provided (figure 1.3a–d). The
directions for using this lens are as follows: First locate
bacteria that are provided (figure 1.3a–d). The
directions for using this lens are as follows: First locate
Examples of Bacterial Shapes as Seen with the Bright-field Light Microscope.
(a) Staphylococcus aureus cocci; singular,
coccus (×1,000).
coccus (×1,000).

(b) Bacillus subtilis rods or bacilli; singular, bacillus (×1,000).

(c) A single, large spirillum; plural, spiralla (Spirillum volutans;×1,000).

(d) Numerous, small spirilla (Rhodospirillum rubrum; ×1,000).

Table 1.1 Troubleshooting the Bright-Field Light Microscope |
| Common Problem Possible Correction |
| No light passing through the ocular Check to ensure that the microscope is completely plugged into a good receptacleCheck to ensure that the power switch to the microscope is turned onMake sure the objective is locked or clicked in placeMake sure the iris diaphragm is openInsufficient light passing through the ocular Raise the condenser as high as possibleOpen the iris diaphragm completelyMake sure the objective is locked or clicked in placeLint, dust, eyelashes interferring with view Clean ocular with lens paper and cleanerParticles seem to move in hazy visual field Air bubbles in immersion oil; add more oil or make certain that oil immersion objective is in the oilMake sure that the high-dry objective is not being used with oilMake sure a temporary coverslip is not being used with oil. Oil causes the coverslip to float since the coverslipsticks to the oil and not the slide, making viewing very hazy or impossible |


